While printing to paper perpetually seems to be “going the way of the Dodo,” the need to print something on an actual piece of paper nonetheless has a way of showing up when we least expect (or desire) to see it. Naturally, no one who encounters this need on a mobile device really wants to get up and print the same document from a traditional computer. As anyone who frequently uses the AirPrint feature on an iPhone can attest, most consumer-grade printers’ support for AirPrint is sketchy at best. For most, all it takes is for the printer to go into an extended sleep and it is no longer available for AirPrint until it is manually woken up by a human.
Leveraging Linux and the Raspberry Pi for AirPrint
For many decades Unix – and later on Linux – has offered robust printer-sharing solutions. CUPS, shorthand for Common Unix Printing System, is the go-to server tool for managing access to printers that need to be shared with multiple users on a network. The Raspberry Pi device offers a low-cost hardware solution, both in terms of purchase cost and operational cost, that allows for users to leverage Linux and CUPS for the purposes of sharing a printer over a network.
A Raspberry Pi 4 with 4GB of RAM running Raspberry Pi OS version 11 (Bullseye) was used for the purposes of this embedded programming tutorial. The default pi user account was used to configure the service. The printer used for this demonstration was a Canon MG 3222. The Raspberry Pi device must be connected to the same LAN that the iOS devices are connected to. This doesn’t mean that it must be connected wirelessly. Ideally the Raspberry Pi should have a wired Ethernet connection into the same network that the Wireless Access Point or Wireless Router serves.
The Raspberry Pi OS, formerly known as Raspbian, typically includes the CUPS daemon, known as cupsd installed and set to run on boot by default. If this is not the case, the daemon can be installed and enabled using the apt package manager and systemctl service manager. If cupsd is not configured to run at boot, it must be manually enabled or printing will not work.
How to configure CUPS
To ensure that cupsd is indeed running, use the command:
[email protected]:~ $ systemctl status cups
This should return a screen similar to the one below. Depending on the system setup, a sudo prefix may be required:
Figure 1 – Verify that CUPS is installed and running
By default, the pi user account should be configured as a member of the lpadmin Linux group. This can be verified with the command:
[email protected]:~ $ cat /etc/group | grep lpadmin

Figure 2 – Confirm that the pi user is a member of the lpadmin group
This shows that the pi user is a member of the lpadmin group. If this is not the case, or if an account other than pi is being used, then that group assignment needs to be made before continuing or else it will not be possible to configure the print server.
How to Install the foomatic-db Package
The foomatic-db Linux package adds significantly to the list of printers that Linux is able to support, and it should be installed if not already present:
[email protected]:~ $ apt list –installed | grep foomatic-db
If no results are returned, use the package manager to install it:
[email protected]:~ $ sudo apt-get install foomatic-db
How to Access CUPS
CUPS is web-managed, meaning it can be accessed by opening a browser within Raspberry Pi and browsing to https://localhost:631 (an invalid certificate warning will appear and can be dismissed). The following screen should appear:

Figure 3 – CUPS Home Page via “fake” https
IMPORTANT NOTE: While cupsd is not typically configured by default to allow access to the web administration page from outside of localhost, this is not guaranteed. It should also be verified that the device cannot be browsed to externally.
Verifying Printer Configuration
As not every printer plays nicely with Linux, it will be necessary to confirm that the printer is both connected to the Raspberry Pi device and configured in the Raspberry Pi OS. Luckily, CUPS makes it easy to do both. Make sure that the printer is connected directly to the Raspberry Pi device via USB. Within the CUPS homepage, click on the “Administration” tab and the following screen should appear:
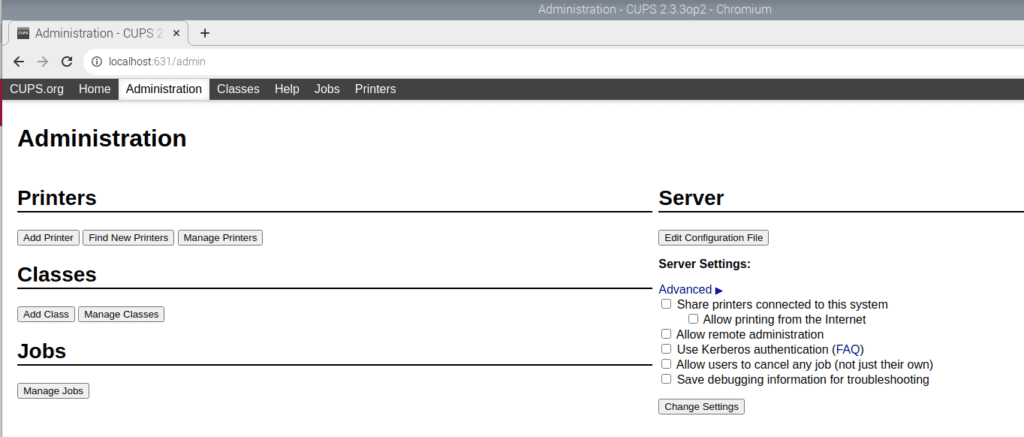
Figure 4 – CUPS administration tab
Click on the “Add Printer” button. A prompt for the credentials will appear. For this demonstration, the userid and password of the pi user account will be entered. Note that only members of the lpadmin group will be able to successfully authenticate at this prompt.
IMPORTANT NOTE: cupsd by default allows for both http other https access. This can be managed in the configuration file, but in the meantime, be mindful to not enter passwords on an http page. If this page is to be accessed remotely, it is strongly recommended to use a proper SSL certificate.
IMPORTANT NOTE: Modern Linux installations should never be configured with a root password or allow for direct root login, but if the Raspberry Pi device is configured in such a way, the root password should never be used under any circumstances here.

Figure 5 – Authentication Page – Credentials for lpadmin group member needed
Upon successfully logging in, any supported printer will be detected. In this case, the desired printer is the Canon MG3200 series, as the printer is a Canon MG3222 printer:
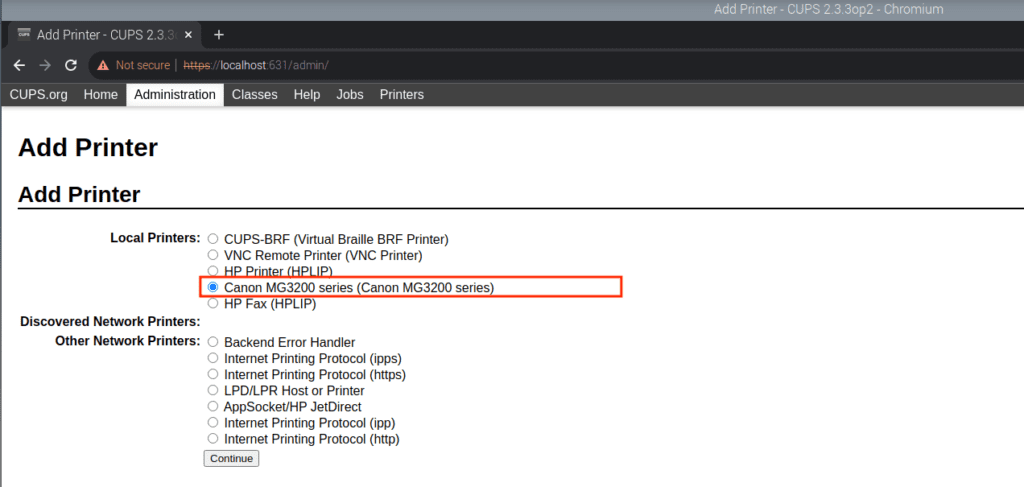
Figure 6 – Initial Printer Selection
Select the printer and click the “Continue” button. A suitable description and name should be used for the printer, and the “Share This Printer” checkbox should be checked:
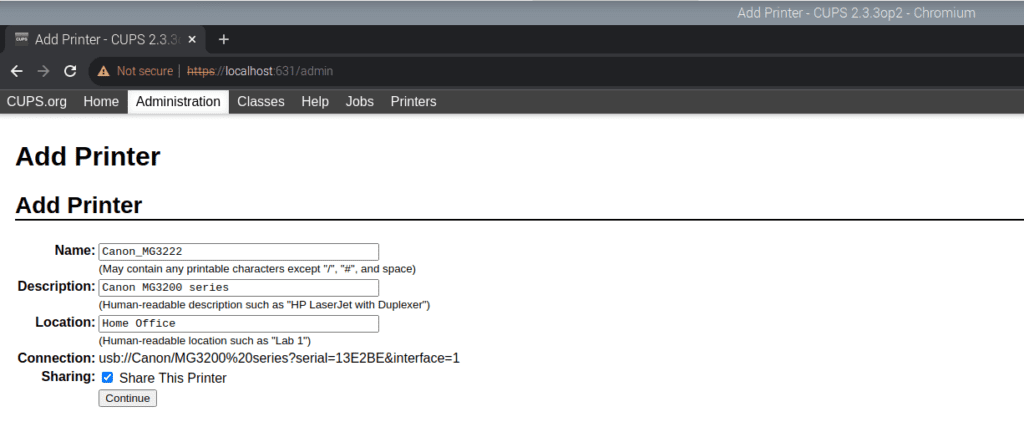
Figure 7 – Printer Description Entry
Upon completing this page, click the “Continue” button:
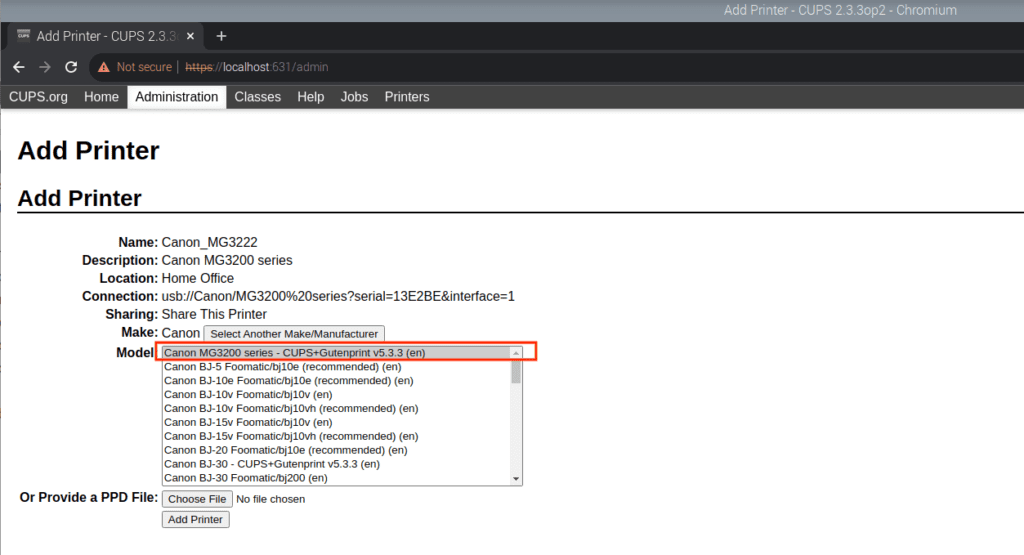
Figure 8 – Extended Printer Model Selection thanks to foomatic-db
The addition of the foomatic-db package enabled the Canon MG3222 printer to be automatically discovered by CUPS, and provided a suggested driver for the same. If the printer’s make and model are not listed, it is possible, although far more difficult, to make use of a PPD (PostScript Printer Definition) file if one can be found for that printer.
IMPORTANT NOTE: While it is possible to copy a PPD file from another system, there is no guarantee that it will work, as there may be settings hard-coded within the PPD file for that other system.
Upon selecting the appropriate printer make and model, click the “Add Printer” button. The next screen will allow for the printer’s default options to be set:

Figure 9 – Printer Options – Updated with Desired Values
Note that for some printers, it will be necessary to scroll the page to see all of the options along with the “Set Default Options” button. Note, also, that there may be other options under other tabs, including “Banners” and “Policies” tabs. These should be verified before continuing. Depending on the printer, not all of the tabs may be present.
Once the desired default settings are in place, click the “Set Default Options” button. The completed setup screen (take note of the “Not Shared” bit) should then appear after an automatic refresh of a shorter confirmation screen:
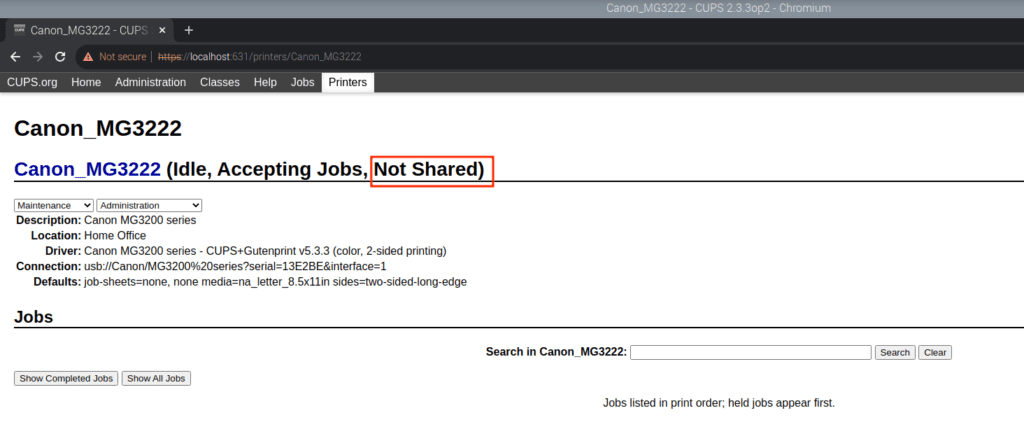
Figure 10 – Completed Printer Setup
From this screen, click on the “Administration” tab in the very top menu bar once again.

Figure 11 – Enabling Sharing
Click both the “Share printers connected to this system” and the “Allow printing from the Internet” options.
IMPORTANT NOTE: With this setup, the only thing preventing anyone from anywhere in the world from printing to this printer is a properly configured network firewall.
Click the “Change Settings” button here.

Figure 12 – Server Restarting
IMPORTANT NOTE: The refresh settings of this page may be too fast to wait for the cupsd server to restart, and an error message may appear here. If that happens, wait a few seconds and refresh the page.
The Administration page will now appear as above, with the sharing settings checked.
Optional Step: Configure Default Printer
If any printing is to be done from the Raspberry Pi device itself, then this printer should be configured as the default for this device. This is not needed for any AirPrint or other remote client though.
iOS Setup with CUPS
The following Apple devices were used for this demonstration:
- iPhone SE Second Generation running iOS 15.1
- iPad 6th Generation running iOS 15.1
Both of these devices are connected to a WiFi network, which connects to a wired network on which the Raspberry Pi device sits. All devices are on the same TCP/IP network segment.
The easiest way to set up a printer in iOS is to load up content that one wishes to print, and then use the “Print” dialog from within the application. For this demonstration, consider the image below created in the “Notes” app on the iPhone:

Figure 13 – A poorly drawn “Hello World” image, suitable for framing.
Each app has its own way of printing, but for the “Notes” app, it can be done by pressing the “Done’ button upon completion of the drawing, pressing the … button that replaces it, and sliding the submenu up from the bottom of the screen:
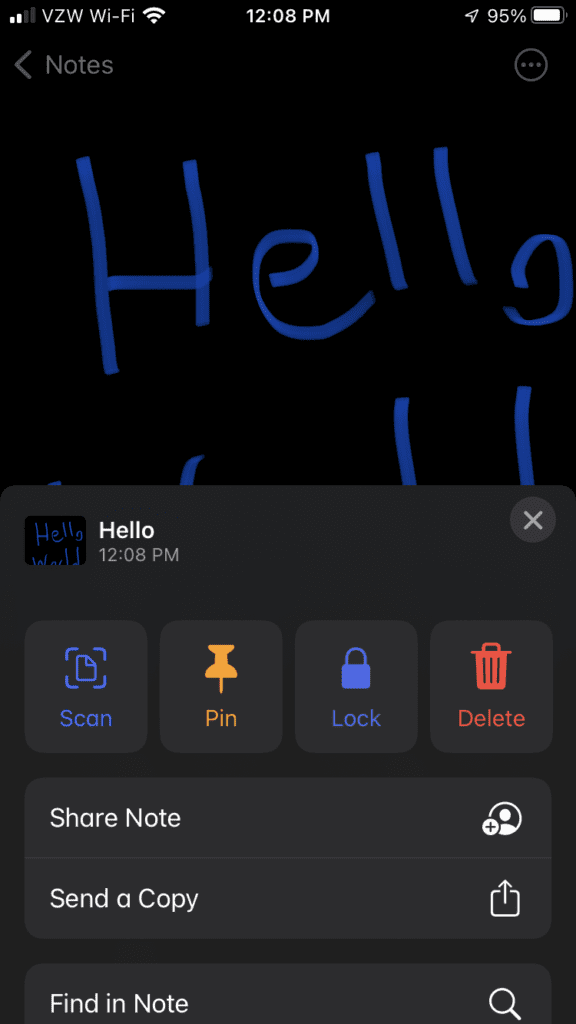
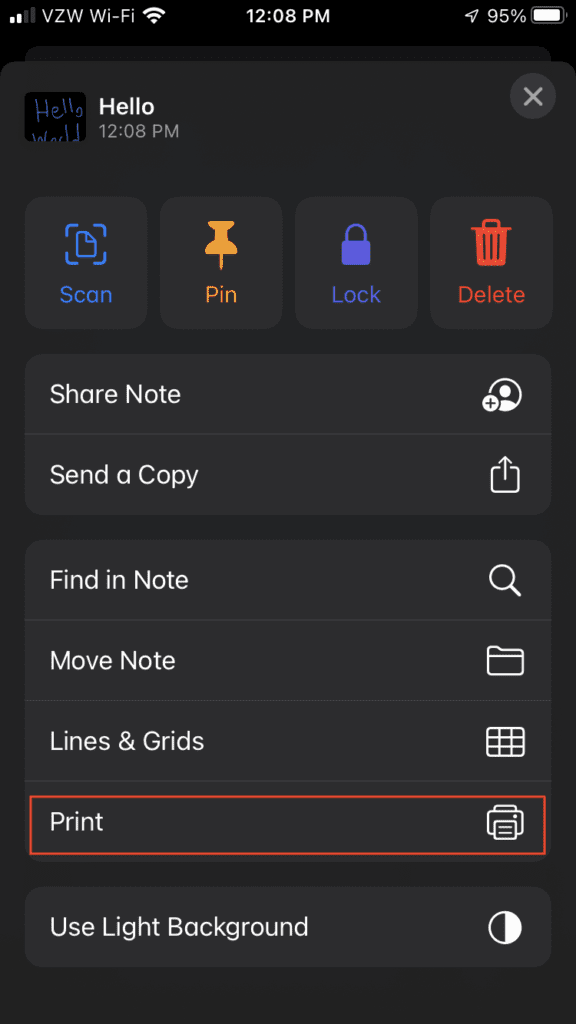
Figures 14 and 15 – Printing from the “Notes” app
While each app has its own way of printing, the printing process for any given app, once it is accessed, is usually the same. On this particular iPhone, there is no existing printer configured, so there is “No Printer Selected” initially:
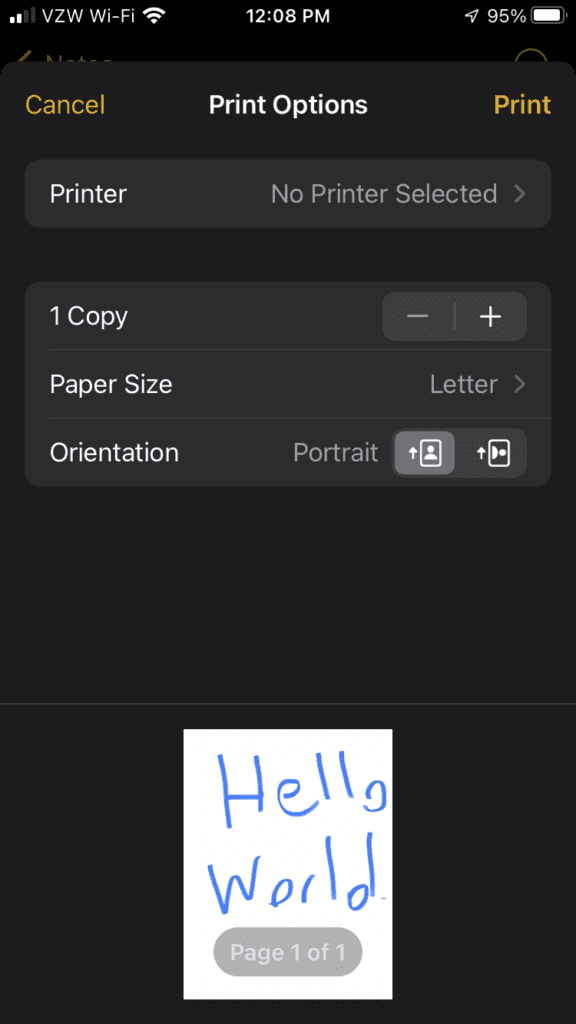
Figure 16 – The initial Print dialog with no printer configured
Tapping the “No Printer Selected” button enables the iPhone to look for any AirPrint printers that are available, and, sure enough, the one running on the Raspberry Pi device will show up:
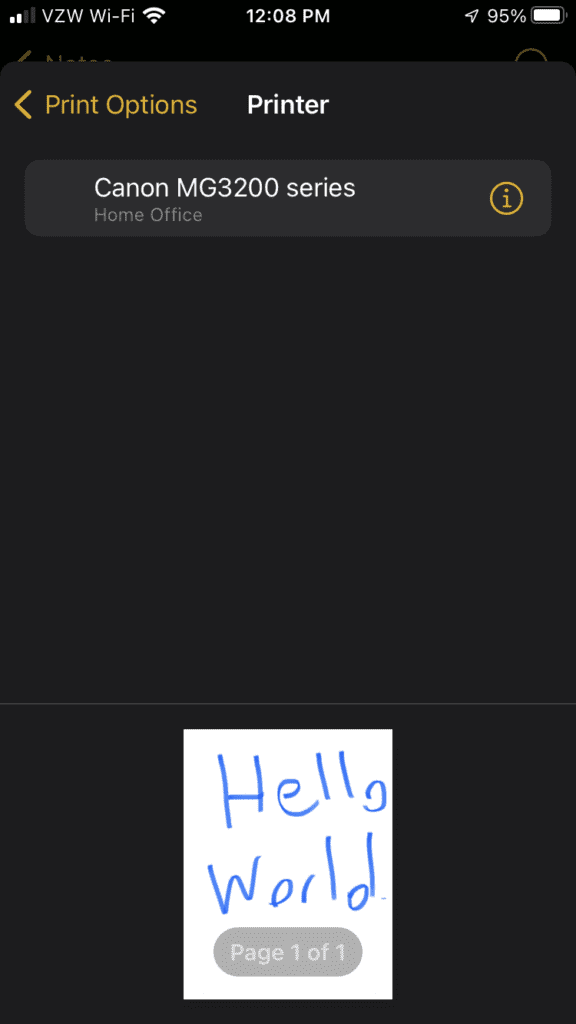
Figure 17 – Finding the new AirPrint Printer
Tapping on the “Canon MG3200 series” button will reveal the “Print” button, along with any one-time customizations that may be desired for the particular print job:
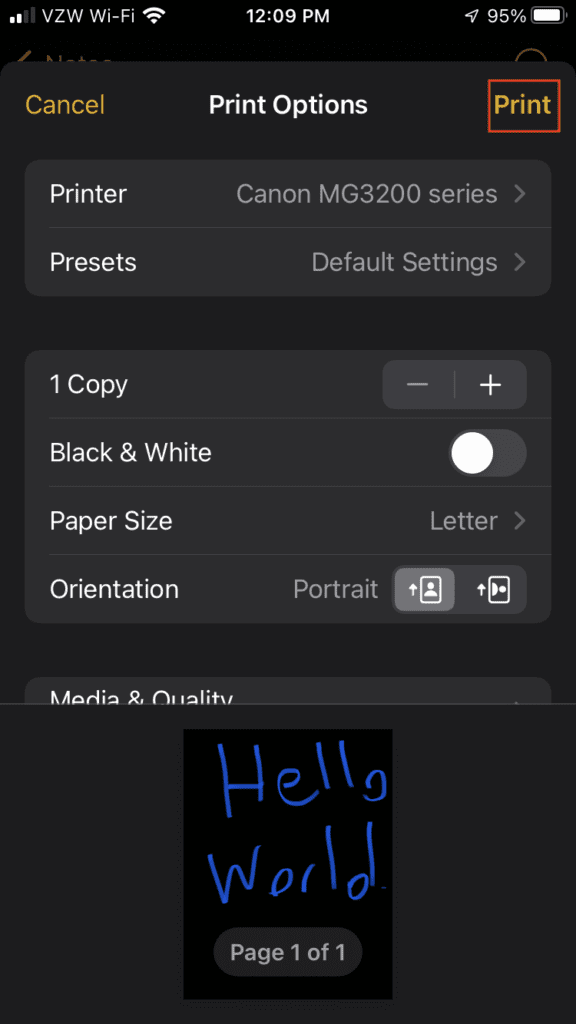
Figure 18 – The actual “Print” button
Tapping the “Print” button yields the finished product:

Figure 19 – The Printed Output
Going Further: Other Devices on CUPS
This setup, of course, is not limited to just iOS devices. It can work with any network-enabled device that can communicate with CUPS. These include Windows computers, Mac OSX computers, and Android devices.
Conclusion to Raspberry Pi and Cups Airprinting
The Raspberry Pi can provide a robust local print server that can meet the needs of the occasional or even frequent print user. It takes the frustration out of poor quality AirPrint implementations and it can even create AirPrint access with printers that do not support AirPrint, provided that they can work with CUPS. The other major advantage of using this device is that the costs of leaving it on 24/7 while connected to the network are negligible.
